

Recently, there was yet another discussion about DPI (dots per inch) vs PPI (pixels per inch) on LinkedIn. Which triggered David Van Driessche, who has been involved in the Ghent Workgroup in various positions since the start, to write a post on it. And that post had some interesting comments, which inspired me to write this article. Because we are making a fundamental mistake: we should stop asking customers for 300 PPI (or DPI) images, without any further context, and start giving the minimal dimensions in pixels for that picture instead! Let me explain why this makes a big difference. Plus: I’ll provide two tools to easily calculate the dimensions of digital images you need for the layout of print publications!
CONTENTS: Resolution is critical | The Image Size Calculator | LFP: a different beast | The image resolution test | Special cases: logos and 1-bit images | 72 PPI for the web – not so fast! | Why is this important? | Updates
Resolution is critical: it will define the quality of your print job. A low-resolution image on high-quality paper will look bad. But on a newspaper substrate, it might look good enough. So, which resolution you need depends on the type of print job. The Ghent Workgroup (GWG) has done a really great job defining and providing specifications for different types of print jobs, including the image resolution in a print-ready PDF. Plus, you don’t need to read through the technical stuff, which is quite boring for most people. The GWG has also published application settings that you can download for free. For example, settings for exporting a document from Adobe InDesign into a print-ready PDF. If you never checked these, do this immediately. Well, immediately after finishing reading this post, of course.
Before I go into the very basic reasons why you should stop asking for 300 PPI or DPI images for print publications, let me get to the most important part of this post: the calculators.
The Image Size Calculator
To be able to output a PDF with the right quality (i.e., the right resolution), you will need images with the appropriate quality in the layout document. What matters is the dimensions in pixels, and that’s what you can calculate with the calculator below.
Please note: you can not edit the Excel files below in the browser (unfortunately), so you need to download the documents to use them. There is a link under the two documents, and here is a zip-file with both of them (v1.1).
UPDATE 27/04/2025: I have updated the calculators since there was an error in the LFP version, plus added something new. Please update from v1.0 to v1.1!
To use the calculator, you start with the size of the image as it will be printed, as defined in the layout document. The calculator has two possibilities: the metric system (with centimeters as a unit) or the imperial system (with inches as a unit). Based on those print dimensions, the minimum size in pixels for the image will be calculated. It’s those dimensions that your customer or the photographer needs. Plus the instruction that he should not upscale a low res image to those dimensions, that doesn’t work.
Although the GWG has more specifications, I decided to reduce these to three groups, to reduce complexity: General use, Newspapers, and Packaging. For example, the GWG uses slightly different resolutions in packaging e.g. for offset printing and flexo printing. It could become overwhelming and scare you if I were to list all these different options. The difference in the specifications is relatively small, I used the highest quality in that specific group in the calculator. To be clear, ‘General use’ is everything except newspapers and packaging, and one very special type: LFP (large format printing), which I’ll discuss below.
ADDED 27/04/2025: based on a comment on my LinkedIn post, I have added MP (megapixels) to the calculations, which is probably more convenient for photographers. And I explicitely added that you should never upscale images to the required solutions, this won’t improve the quality of the image! And for the record I also added that downscaling to the minimal required dimensions is not necessary: this will be done automatically during the export to PDF by the layout application.
LFP: a different beast
Large-format printing (LFP) is a different beast, with more variables, whether digitally printed or, for example, via screen printing. That’s why I created a separate calculator for that one. This type of printing adds two essential variables: a scaling factor and the viewing distance.
Given the sometimes very large print output dimensions, e.g., a large billboard, the layout document and, therefore, the print-ready PDF often have smaller dimensions: a ‘scaling factor’ is applied. You should best ask the LFP print provider upfront what scaling factor you need to use to create your layout document and, therefore, the print-ready PDF.
Next to the scaling factor, the viewing distance is also critical and needs to be taken into account. If you have no idea what I’m talking about, do the following test: if there is a billboard or another huge print in your neighborhood, first look at it from a ‘normal’ viewing distance and then walk towards it. You will notice that the closer you get, the quality will start going bad. And close by, like a reading distance, you will see a complete lack of details. But you will NEVER look at billboards like this from this distance, that’s why that viewing distance is essential.
The image resolution test
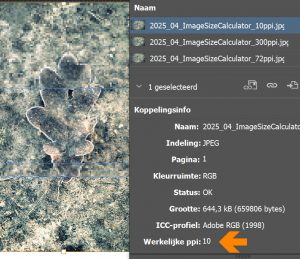
I’ve assembled a small test to show why you should stop asking for 300 PPI images. Below you see a PDF with a photo. Well, actually, that photo consists of three images. I placed three images in the layout document with the following resolutions: 300 PPI, 72 PPI, and – why not – 10 PPI. Can you spot which part had which resolution?
 Loading...
I guess you couldn’t spot which part was from which image. You know why? Because in the final PDF, everything was converted to the same resolution. How could that be possible? Well, it’s not the resolution (PPI/DPI) of the images you place in a design document that matters; it’s the image dimensions (width/height in pixels) that matter. And all three images had the same dimensions: 996 x 664 pixels. And that’s why you should ask for images with a specific dimension, instead of a 300 PPI image.
And to make it even clearer: there is a dirty trick to create 300 PPI images… You can easily upscale any image to 300 PPI in Adobe Photoshop or any other image editor. And that’s really not what you want! Really NOT. And that’s the risk when you keep insisting on 300 PPI images: ‘clever’ customers will upscale a bad image, which will only result in a big bad image.
Special cases: logos and 1-bit images
If you need to print a logo, you would probably want to opt for a different path: using a vector-based image, not a ‘raster image’. In a vector image, the artwork is described as mathematical equations, that’s the way you create images in Adobe Illustrator. In a raster image, you have a fixed number of pixels that you will color, what you do in Adobe Photoshop. Vector-based images have two huge advantages: the file size can be very compact, plus: you can scale it indefinitely without any quality loss! (unless rasterized information is included) This website shows some nice examples!
The other special case is 1-bit images. These are ‘images’ with either black or white. No grays in between! These are usually images that have already had a kind of pre-treatment in prepress (‘rasterization’), and it’s not something that comes out of your camera. So, I decided to leave this option out of my calculators, it might have added unnecessary complexity. However, the GWG specifications do include specific requirements and settings for this kind of image. By the way, this is why the calculators mention ‘grayscale or color images’ to distinguish between 1-bit images.
72 PPI for the web – not so fast!
It is often said that the web is 72 PPI (or DPI). But is that true? Well… times have evolved…
Let’s look at the CSS specifications: a pixel is defined as 1/96th of an inch…
![]()
Also, if you look at the resolution of displays, times have changed. The 27-inch monitors I use at work and at home have a 4K resolution, meaning >150 PPI.
And when we look at smartphones, the pixel density is even more impressive. The Apple iPhone 16 Pro Max has 460 PPI, and the Samsung Galaxy S25 Ultra has even more: 500 PPI.
Why is this important?
Asking your customer for a 300 PPI or DPI image focuses on the wrong parameter, which could lead to quality issues: a clever customer could just upscale the low-resolution images from 72 PPI to 300 PPI and think it’s fixed. But it won’t be: it’s just a bigger bad image.
The 300 PPI DOES matter for a print-ready PDF. But in your layout, even 10 PPI images could work fine, as my little test showed. So, we should make it a habit to specify the minimal picture dimensions, in pixels, when asking a customer for pictures. Including the message that they should not upscale low res images to those dimensions.
The small calculators I included in this article are helpful tools for checking the minimal dimensions needed for quality output for different print applications. Use them! And share them…
Added: on LinkedIn David Blattner (Creative Pro) made a remark that asking for 300 ppi can work, if you add the necessary context: the size. E.g. 300 ppi at 2 inches. This indeed works as well. It’s up to you to pick the one that fits you best: the dimensions in pixels, or the ppi with the extra context of size.
PS: in case you discover an error in the calculators (especially the LFP versions, which is a bit more complicated), please let me know! Also if you have suggestions!
UPDATE 27/04/2025: I have updated the calculators since there was an error in the LFP version, plus added something new. Please update from v1.0 to v1.1! Here is a zip-file with both of them (v1.1).

Good discussion Eddy as always.
From my perspective, when preparing a photograph for printing, I prepare the image in Adobe Photoshop.
In general I like to keep the image in it’s full size and safe it for myself in native Adobe Photoshop format.
When I then need to use the image – say for print, I open the image in Adobe Photoshop, convert it to the destination CMYK colourspace and then I open “Image Size”.
Here I make sure that WHEN the image is at 300 Pixels/Inch (which is the equal to 300 Dots per Inch or DPI – and the equal to 300 Pixels Per Inch or PPI, that the image is the right size – in Centimeters, since I am a European (or you can do it, in inches if you prefer).
When preparing images for professional printing, – yes sure the pixel size is what matters, not the PPI/DPI but to make things easy for yourself, just create the image in the final size you want to print it in – and make sure that it is also 300 Pixels/Inch.
Then, when you place the image within your layout – in Indesign or Illustrator, it will be in the correct size within the layout. This is a safe and prooven method that has been used for decades and I honestly don’t see any reason to change it.
72 dpi images are a headache and the last time I checked, Enfocus and other programs that are created to check layouts headed for print are programmed to flag 72 dpi images within the layout, – which again takes up valuable time for the operator to check if it is another screengrab that the idiotic customer decided to grab from some random website and use for his brochure, because it looks so pretty on his screen.
Ingi, you can save yourself a lot of work by just using the original images WITHOUT any conversion in Adobe Photoshop. Place these in Adobe InDesign or any other layout application and let that application do the conversion of both the color space and the resolution. Just by using the appropriate PDF output settings (for Adobe InDesign you just download them from the GWG website). You could even output to a RGB PDF (PDF/X-3 or X-4, which are also supported by the GWG) and let the RIP do the conversion CMYK.
What Enfocus and the likes will check, depends on the profile used. But the specifications by the GWG require higher resolutions than 72 dpi/ppi. Because printers (conventional/digital) require higher resolutions. The fact that there are 72 dpi/ppi images in the PDF either means the PDF was created with the wrong settings (and downsampled good images to a bad resolution), or low res images were used in the design. And that’s what should be prevented, by giving correct information to content creators about the minimum size that is needed.
Interesting.
I don’t actually do a lot of layout work with photographs intended for print these days so I am sticking to using Photoshop to prepare the few photographs I need to use.
But what instructions would you give to content creators if you were a print shop owner as to handling of photographs to be placed within layouts that are to be printed on your printing presses?
My advise to content creators: keep your artwork in the original format (both size and color profile) as long as possible. So certainly in the layout document, these applications can handle both RGB and CMYK, and ‘oversized’ pictures. With the right GWG PDF output settings, these will create a PDF with the right resolution (downscaling images that have a resolution that is too high) and will keep the color information intact (when choosing the output settings that can include RGB images). For pictures and other content in RGB, just let the RGB to CMYK conversion being done by the RIP, at the printing company.